AMPとは
AMPとは、AMP(Accelerated Mobile Pages)の略であり、Googleが推進しているモバイルページを高速に表示させるための手法によって作成されているコンテンツ。
近頃、Googleはページランクの評価基準として、ホームページの表示速度を指標の一つとして導入しており、その親分のGoogleがAMPという規格を推進しているという訳だ。
ページのロードが早いに越したことはないので、AMPを導入することにした。
![]()
WordPressにAMP導入
WordPressのコンテンツをAMP化するやり方はいくつかあるが、大きく分けて以下の2つの方法がある。
(1)AMPプラグインを導入する(Google公式プラグイン)
(2)WordPressテーマ付属のAMP表示設定を利用する(Simplicity2等)
どちらの方法でも良いのだが、メリット・デメリットがある。
| AMP導入方法 | テーマの引き継ぎ | GoogleAnalytics対応 | Google Adsense対応 | Amazonアソシエイト対応 |
| (1)AMPプラグイン導入 | ☓ (テーマは引き継がれず、1からカスタマイズが必要) |
△ (自分で設定すれば対応可能) |
△ (自分で設定すれば対応可能) |
△ (自分で設定すれば対応可能) |
| (2)WordPressテーマ付属のAMP表示設定を利用 | ◯ | △ (自分で設定すれば対応可能) |
△ (自分で設定すれば対応可能) |
☓ (表示不可) |
(1)AMPプラグインは、完成度が高く、不具合も出にくいが、テーマを引き継がないため、1からカスタマイズが必要となり、面倒である。
ただ、仕方がないので、多少の面倒さには目を瞑り、(1)AMPプラグインを導入することにした。
AMPプラグインのカスタマイズ(準備編)
AMPプラグインの持つテンプレートファイル群をコピーする
$ cp -rf {Wordpressインストールディレクトリ}/wp-content/plugins/amp/templates/ {Wordpressインストールディレクトリ}/wp-content/themes/amp
所有者がwww-dataの場合は、この所有者に変更。
$ sudo chown -R www-data.www-data {Wordpressインストールディレクトリ}/wp-content/themes/amp
コピーされたファイル群はこんな感じのはず。
admin
featured-image.php
footer.php
header-bar.php
header.php
html-end.php
html-start.php
meta-author.php
meta-comments-link.php
meta-taxonomy.php
meta-time.php
page.php
single.php
style.php
カスタムテンプレート有効化(必須)
上記でコピーしたカスタムテンプレートを有効化する。
使用しているテーマ(私の場合は、Simplicity2)のディレクトリ配下にある「function.php」の一番最後に以下を追記する
$ sudo vi {Wordpressインストールディレクトリ}/wp-content/themes/simplicity2/function.php
//追記

function custom_amp_template( $file, $type, $post ) {
if ( is_string( $type ) && preg_match( '/\A[a-z\-]+\z/', $type ) ) {
$file = WP_CONTENT_DIR . '/themes/[カスタムテンプレートDIR]/amp/' . $type . '.php';
}
return $file;
}
add_filter( 'amp_post_template_file','custom_amp_template', 10, 3 );
Google Analytics設定
AMPのプラグイン設定項目の「Analytics」に以下のように追記。
ID:
googleanalytics
JSON Configuration:
{
  "vars":{
    "account":"UA-XXXXXXXX-X"
  },
  "triggers":{
    "trackPageview":{
      "on":"visible",
      "request":"pageview"
    }
  }
}
投稿者名を削除(meta-author.php)
「meta-author.php」の以下を削除する。
 <div class="amp-wp-meta amp-wp-byline">
                <?php if ( function_exists( 'get_avatar_url' ) ) : ?>
                        <amp-img src="<?php echo esc_url( get_avatar_url( $post_author->user_email, array( 'size' => 24 ) ) ); ?>" width="24" height="24" layout="fixed"></amp-img>
                <?php endif; ?>
                <span class="amp-wp-author author vcard"><?php echo esc_html( $post_author->display_name ); ?></span>
        </div>
サイトアイコンの表示を削除
「header-bar.php」の以下の記述を削除
                       <?php $site_icon_url = $this->get( 'site_icon_url' ); ?>
                        <?php if ( $site_icon_url ) : ?>
                                <amp-img src="<?php echo esc_url( $site_icon_url ); ?>" width="32" height="32" class="amp-wp-site-icon"></amp-img>
                        <?php endif; ?>
投稿日時→更新日時に表示変更(meta-time.php)
「meta-time.php」 の ‘post_publish_timestamp’ を ‘post_modified_timestamp’ に変更。
※2箇所変更した
<div class="amp-wp-meta amp-wp-posted-on">
        <time datetime="<?php echo esc_attr( date( 'c', $this->get( 'post_modified_timestamp' ) ) ); ?>">
                <?php
                echo esc_html(
                        sprintf(
                                _x( '%s ago', '%s = human-readable time difference', 'amp' ),
                                human_time_diff( $this->get( 'post_modified_timestamp' ), current_time( 'timestamp' ) )
                        )
                );
                ?>
        </time>
</div>
パンくずリストの設置
「single.php」の<header></header>の中に、パンくずリストを設置する。
以下のコードを追加する。
<a href="<?php echo esc_url( $this->get( 'home_url' ) ); ?>">
 <?php echo esc_html( wptexturize( $this->get( 'blog_name' ) ) ); ?>
</a>
<?php echo ' > '; ?>
<?php
$category = get_the_category();
if ( $category[0] ) {
echo '<a href="' . get_category_link( $category[0]->term_id ) . '">' . $category[0]->cat_name . '</a>';
}
?>
<?php echo ' > '; ?>
<?php echo esc_html( $this->get( 'post_title' ) ); ?>
<h1><h2><h3>…タグの表示スタイル変更(style.php)
「style.php」の見出しタグとして、以下を追加。
.amp-wp-article h1,
.amp-wp-article h2,
.amp-wp-article h3,
.amp-wp-article h4,
.amp-wp-article h5,
.amp-wp-article h6{
position:relative;
margin-top:35px;
margin-bottom:20px;
}
.amp-wp-article h1 {
margin-top:30px;
margin-bottom:20px;
font-size: 30px;
line-height:117%;
}

.amp-wp-article h2 {
border-left:1px solid #000;
margin: 40px -29px 20px;
padding:25px 30px;
font-size:26px;
}

.amp-wp-article h3{
font-size:23px;
border-bottom:5px solid #e7e7e7;
padding:10px 0;
}

.amp-wp-article h4, .article h5, .article h6{
font-size:20px;
padding:8px 0;
}

.amp-wp-article h4{
border-bottom:5px dashed #eee;
}
表のCSSを追加する
AMP for WordPressは、表の罫線が非表示なってしまう。
この対策として、スタイルシートに表関連の表記を追加する。
.amp-wp-article table {
width: 100%;
font-size: 0.92em;
border: 1px solid #efefef;
margin-bottom: 1.5em;
border-spacing: 0;
}

.amp-wp-article table caption {
margin: 0 0 7px;
font-size: 0.75em;
color: #9fa6b4;
text-transform: uppercase;
letter-spacing: 1px; }

.amp-wp-article tr {
border-bottom: 1px solid #efefef;
}

.amp-wp-article td {
padding: .8em;
border: 1px solid #cfcfcf;
background: #fff;
background: rgba(255, 255, 255, 0.6);}
.amp-wp-article td input{
margin:3px 0;
}

.amp-wp-article th {
background-color: #eee;
background-color: rgba(0,0,0,0.1);
border: 1px solid #cfcfcf;
padding: .8em;
}
Powered by WordPress を削除(footer.php)
「footer.php」のPowered by WordPressに関連する、以下の記述を削除
                        <a href="<?php echo esc_url( esc_html__( 'https://wordpress.org/', 'amp' ) ); ?>">
                                <?php
                                // translators: %s is WordPress.
                                echo esc_html( sprintf( __( 'Powered by %s', 'amp' ), 'WordPress' ) );
                                ?>
                        </a>
Google Adsense関連
●関連コンテンツ表示設定
■「html-start.php」の<head>内
<script async custom-element="amp-ad" src="https://cdn.ampproject.org/v0/amp-ad-0.1.js"></script>
以下のコードを「single.php」の配置したい場所に追記する。
<amp-ad layout="fixed-height" height="500" type="adsense"
 data-ad-client="ca-pub-xxxxxxxxxxx"
 data-ad-slot="xxxxxxxxxxx"></amp-ad>
●AMP 自動広告 – テキスト広告とディスプレイ広告
以下、2つのコードを挿入する。
■「html-start.php」の<head>内
<script async custom-element="amp-auto-ads" src="https://cdn.ampproject.org/v0/amp-auto-ads-0.1.js"></script>
■「html-start.php」の<body>内
<amp-auto-ads type="adsense" data-ad-client="ca-pub-xxxxxxxxxxxxxx"></amp-auto-ads>
「logo」フィールドの値は必須です。 の修正
Googleの提供する「AMPテスト」を実施すると、「構造化データの項目が不足しているか無効です」というエラーが出る。
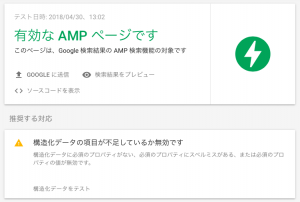
「構造化データをテスト」を実施すると、「logo」フィールドの値は必須です。というエラーが発生している。
![]()
まず、logoの画像を準備する。ここで気をつけたいのは、
AMPの仕様によると、publisherのlogoは、
Logos should be no wider than 600px, and no taller than 60px.
なので、600px以下の幅で、60px以下の高さじゃないとだめ。ということ。
「wp-content/plugins/amp/includes/template/class-amp-post-template.php」に以下の追記を行うことで、エラーは修正される。
●これは削除かコメントアウト
                $site_icon_url = $this->get( 'site_icon_url' );
                if ( $site_icon_url ) {
                        $metadata['publisher']['logo'] = array(
                                '@type'  => 'ImageObject',
                                'url'    => $site_icon_url,
                                'height' => self::SITE_ICON_SIZE,
                                'width'  => self::SITE_ICON_SIZE,
                        );
                }
●以下を追記
                        $metadata['publisher']['logo'] = array(
                                '@type'  => 'ImageObject',
                                'url'    => 'https://blog.bnikka.com/wp-content/uploads/2018/04/palm2_amp-1.png',
                                'height' => 32,
                                'width'  => 32,
                        );
SNSシェアボタンを追加する
コードを挿入する。
■「html-start.php」の<head>内
<script async custom-element="amp-social-share" src="https://cdn.ampproject.org/v0/amp-social-share-0.1.js"></script>
シェアボタンを設置したい場所に、以下のコードを追記
<div>
<amp-social-share type="twitter"></amp-social-share>
<amp-social-share type="gplus"></amp-social-share>
<amp-social-share type="email"></amp-social-share>
<amp-social-share type="pinterest"></amp-social-share>
<amp-social-share type="linkedin"></amp-social-share>
<amp-social-share type="facebook"
data-param-app_id="(FacebookのAPP ID)"></amp-social-share>
</div>
feedlyボタンを設置する
シェアボタンを設置したい場所に、以下のコードを追記(single.php等)
※Simplicity2テーマを前提
<!-- feedly -->
<div class="self-feedly">
<a href="//feedly.com/i/subscription/feed/<?php bloginfo("rss2_url"); ?>" title="<?php _e( 'Feedlyに追加します', 'simplicity2' ) ?>" class="sefe-link" rel="nofollow"><span class="sefe-text">Feedlyに追加</span></a>
</div>
style.cssの最後に以下を追記
.sefe-link, .sepu-link {
  border-radius: 25px;
  box-shadow: 0 2px 6px rgba(0,0,0,.2);
  display: block;
  height: 48px;
  line-height: 48px;
  margin-bottom: 8px;
  text-align: center;
  text-decoration: none;
  transition: .3s cubic-bezier(.4,0,.2,1);
}

.sefe-link {
  background: #6CC655;
}

.sepu-link {
  background: #efad00;
}

.sefe-link:hover, .sepu-link:hover {
  box-shadow: 0 4px 8px 2px rgba(0,0,0,.2);
  transform: translateY(-1px);
}

.sefe-text, .sepu-text {
  color: #fff;
  font-size: 17px;
  margin-left: 8px;
}

.sefe-text:before, .sepu-text:before {
  display: inline-block;
  font: normal normal normal 28px/1 'icomoon';
  margin-right: 8px;
  position: relative;
  top: 7px;
  -moz-osx-font-smoothing: grayscale;
  -webkit-font-smoothing: antialiased;
}

.sefe-text:before {
  content: "\e92e";
  font-size: 34px;
}

.sepu-text:before {
  content: "\e90e";
}
コメント
[…] 参考にしたのは「blacknikka」さんの記事。この方法であればプラグインの更新が行われても編集したものが保持されると考え、採用するに至った。この方法はすぐに実装できたし特に問題もなく使うことが出来た。 […]